Le but est de piloter par le Wi-Fi, via une IHM sous la forme d'une page web, un robot équipé :
Le serveur HTTP sera programmé en Python.
La carte SD du Raspberry Pi contient le système d'exploitation Raspberry Pi OS (64-bit) avec bureau,
téléchargeable à l'adresse
https://www.raspberrypi.com/sofware/operating-systems/
| Commande | Description |
|---|---|
| ping raspberrypi.local | Teste l'accès au Raspberry Pi et indique son adresse IP |
| ssh eric@raspberrypi.local | Se connecte au Raspberry Pi à distance |
| exit | Quitte ssh |
| ifconfig | Affiche l'adresse IP de la machine locale |
| ls | Affiche le contenu du dossier |
| cat index.html | Affiche le contenu du fichier index.html |
| rm index.html | Supprime le fichier index.html |
| nano index.html | Edite le fichier index.html |
| chmod +x serveur.py | Rend le programme serveur.py exécutable |
| ./serveur.py | Démarre le programme serveur.py |
| sudo raspi-config | Configure Raspberry Pi OS |
| sudo reboot | Redémarre le Raspberry Pi |
| sudo halt | Eteint le Raspberry Pi |
Capture une image enregistrée sous le nom im.jpg
:
rpicam-still -o im.jpg
Capture des images enregistrées sous le nom unique im.jpg
,
toutes les secondes, indéfiniment :
rpicam-still -o im.jpg --timelapse 1000 -t 0 --width 600 --height 400
Capture des images enregistrées sous les noms capture_%04d.jpg
,
toutes les secondes, pendant 30 s :
rpicam-still -o capture_%04d.jpg --timelapse 1000 -t 30000 --width 600 --height 400
Capture une image avec une exposition de 100 s :
rpicam-still -o im.jpg --shutter 100000000 --gain 1 --awbgains 1,1 --immediate
| Option | Paramètre | Description |
|---|---|---|
| --output, -o | Nom de fichier | Fichier de sauvegarde |
| --nopreview, -n | - | Pas de visualisation |
| --timelapse, -tl | Nombre de millisecondes | Laps de temps entre deux images |
| --timeout, -t | Nombre de millisecondes | Durée d'acquisition, |
| --width, -w | Nomre de pixels | Largeur de l'image |
| --height, -h | Nomre de pixels | Hauteur de l'image |
| --quality, -q | Nombre de 1 à 99, par défaut 93 | Qualité de l'image |
| --rotation, -rot | Nombre de degrés | Rotation de l'image |
| --hflip, -hf | - | Miroir horizontal |
| --vflip, -vf | - | Miroir vertical |
Capture une image enregistrée sous le nom im.jpg
:
#!/usr/bin/python3

from picamera2 import Picamera2
import time

picam2 = Picamera2()
picam2.start()
time.sleep(2)
picam2.capture_file("im.jpg")
Capture des images enregistrées sous le nom unique im.jpg
,
toutes les secondes, indéfiniment :
#!/usr/bin/python3

from picamera2 import Picamera2
import time

picam2 = Picamera2()
picam2.start()
while 1:
  time.sleep(1)
  picam2.capture_file("testcam.jpg")
Un programme en Python peut passer des commandes en Bash.
#!/usr/bin/python3
import os
os.system('rpicam-still -o im.jpg --timelapse 1000 -t 0 --width 600 --height 400')
Crée un accès à une broche GPIO :
echo 18 > /sys/class/gpio/export
Configure la broche 18 en sortie :
echo out > /sys/class/gpio/gpio18/direction
Met la broche 18 au niveau haut :
echo 1 > /sys/class/gpio/gpio18/value
Met la broche 18 au niveau bas :
echo 0 > /sys/class/gpio/gpio18/value
Supprime l'accès à la broche 18 :
echo 18 > /sys/class/gpio/unexport
Allume deux DEL pendant deux secondes puis les éteint :
#!/usr/bin/python3

import RPi.GPIO as GPIO
import time

# Initialisation
GPIO.setmode(GPIO.BCM)
GPIO.setwarnings(False)
led1 = 23
led2 = 24
GPIO.setup(led1,GPIO.OUT)
GPIO.setup(led2,GPIO.OUT)

# Allumer les LED
print("LED allumées")
GPIO.output(led1,1)
GPIO.output(led2,1)

# Attendre 2s
time.sleep(2)

# Eteindre les LED
print("LED éteinte")
GPIO.output(led1,0)
GPIO.output(led2,0)
Pour le cas où la bibliothèque RPi.GPIO manquerait :
sudo apt install python3-rpi.gpio

marche.sh
#!/bin/bash
raspistill -o im.jpg -n --tl 1000 -t 0 -w 600 -h 400 &
./serveur.py &
La sortie standard étant encombrée de messages, des redirections s'imposent également.
#!/bin/bash
raspistill -o im.jpg -n --tl 1000 -t 0 -w 600 -h 400 1>/dev/null 2>/dev/null &
./serveur.py 1>/dev/null 2>/dev/null &
stop.sh
Pour stopper le tout :
#!/bin/bash
killall raspistill
killall serveur.py
serveur.py
Dans cette solution, les broches du GPOI sont commandées via la bibliothèque en Python.
#!/usr/bin/python3

import RPi.GPIO as GPIO
import http.server

# Configuration des GPIO pour contrôler les moteurs
GPIO.setmode(GPIO.BCM)
GPIO.setup(23, GPIO.OUT)
GPIO.setup(24, GPIO.OUT)

# Serveur Web sur le port 5555
class rep(http.server.SimpleHTTPRequestHandler):
  def do_GET(self):
    if self.path == '/G1':
      GPIO.output(23, GPIO.HIGH)
    elif self.path == '/D1':
      GPIO.output(24, GPIO.HIGH)
    elif self.path == '/G0':
      GPIO.output(23, GPIO.LOW)
    elif self.path == '/D0':
      GPIO.output(24, GPIO.LOW)
    else:
      super().do_GET()

adr = ("", 5555)
http.server.HTTPServer(adr, rep).serve_forever()
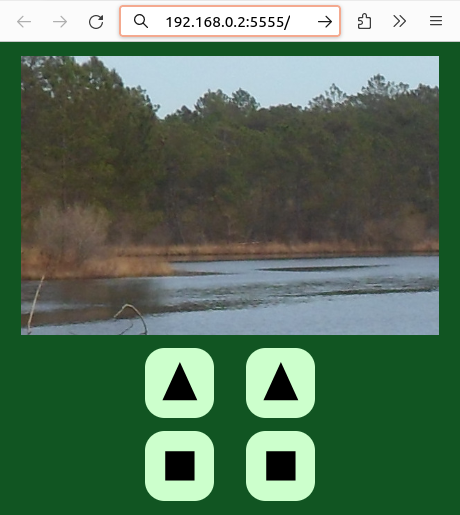
index.html
Particularités de cette solution :
<!DOCTYPE html>
<html>
<head>
  <meta charset="utf-8">
  <style>
  body {
    background-color: #152;
    text-align: center;
  }
  svg {
    width: 100px;
    height: 100px;
    background-color: #cfc;
    border-radius: 28px;
    margin: 15px 20px 0px 20px;
  }
  </style>
  <script>
  ordre=function (val) {
    var xhr=new XMLHttpRequest();
    xhr.open("GET", val, true);
    xhr.send(null);
  };
  var nb=0;
  recharge=function() {
    nb++;
    document.images[0].src="im.jpg?nb="+nb;
  };
  window.onload=function() { setInterval(recharge,1000); };
  </script>
</head>
<body>
  <img src="im.jpg">
  <br>
  <svg onclick="ordre('G1');"><path d="M 25 75 L 50 20 L 75 75"/></svg>
  <svg onclick="ordre('D1');"><path d="M 25 75 L 50 20 L 75 75"/></svg>
  <br>
  <svg onclick="ordre('G0');"><path d="M 29 29 H 71 V 71 H 29"/></svg>
  <svg onclick="ordre('D0');"><path d="M 29 29 H 71 V 71 H 29"/></svg>
</body>
</html>
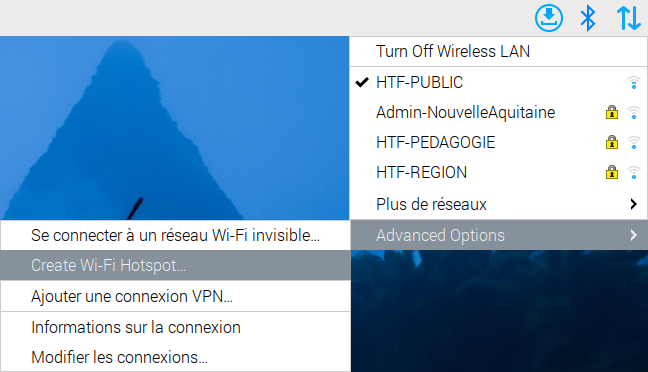
Plusieurs solutions sont envisageables :
Cette dernière solution se met en œuvre simplement en cliquant sur l'icône de gestion des réseaux, en haut à droite de l'écran, et en se laissant guider.
camera.py
Afficher un flux vidéo dans une page Web est un peu délicat. La solution ci-dessous provient de la documentation sur la bibliothèque picamera2, à la page 57, en suivant le lien mjpeg_server.py.
#!/usr/bin/python3

import io
import logging
import socketserver
from http import server
from threading import Condition

from picamera2 import Picamera2
from picamera2.encoders import JpegEncoder
from picamera2.outputs import FileOutput

# HTML page for the MJPEG streaming demo
PAGE = """\
 <!DOCTYPE html >
 <html >
 <img src="stream.mjpg" width="640" height="480" >
 </html >
"""

# Class to handle streaming output
class StreamingOutput(io.BufferedIOBase):
  def __init__(self):
    self.frame = None
    self.condition = Condition()

  def write(self, buf):
    with self.condition:
      self.frame = buf
      self.condition.notify_all()

# Class to handle HTTP requests
class StreamingHandler(server.BaseHTTPRequestHandler):
  def do_GET(self):
    if self.path == '/':
      # Redirect root path to index.html
      self.send_response(301)
      self.send_header('Location', '/index.html')
      self.end_headers()
    elif self.path == '/index.html':
      # Serve the HTML page
      content = PAGE.encode('utf-8')
      self.send_response(200)
      self.send_header('Content-Type', 'text/html')
      self.send_header('Content-Length', len(content))
      self.end_headers()
      self.wfile.write(content)
    elif self.path == '/stream.mjpg':
      # Set up MJPEG streaming
      self.send_response(200)
      self.send_header('Age', 0)
      self.send_header('Cache-Control', 'no-cache, private')
      self.send_header('Pragma', 'no-cache')
      self.send_header('Content-Type', 'multipart/x-mixed-replace; boundary=FRAME')
      self.end_headers()
      try:
        while True:
          with output.condition:
            output.condition.wait()
            frame = output.frame
          self.wfile.write(b'--FRAME\r\n')
          self.send_header('Content-Type', 'image/jpeg')
          self.send_header('Content-Length', len(frame))
          self.end_headers()
          self.wfile.write(frame)
          self.wfile.write(b'\r\n')
      except Exception as e:
        logging.warning(
          'Removed streaming client %s: %s',
          self.client_address, str(e))
    else:
      # Handle 404 Not Found
      self.send_error(404)
      self.end_headers()

# Class to handle streaming server
class StreamingServer(socketserver.ThreadingMixIn, server.HTTPServer):
  allow_reuse_address = True
  daemon_threads = True

# Create Picamera2 instance and configure it
picam2 = Picamera2()
picam2.configure(picam2.create_video_configuration(main={"size": (640, 480)}))
output = StreamingOutput()
picam2.start_recording(JpegEncoder(), FileOutput(output))

try:
  # Set up and start the streaming server
  address = ('', 8000)
  server = StreamingServer(address, StreamingHandler)
  server.serve_forever()
finally:
  # Stop recording when the script is interrupted
  picam2.stop_recording()
marche.sh
Le fichier serveur.py
reste le même.
Les trois autres fichiers doivent être modifiés.
Pour démarrer les deux services :
#!/bin/bash
./camera.py 1>/dev/null 2>/dev/null &
./serveur.py 1>/dev/null 2>/dev/null &
stop.sh
Pour les arrêter :
#!/bin/bash
killall camera.py
killall serveur.py
index.html
<!DOCTYPE html>
<html>
<head>
  <meta charset="utf-8">
  <style>
  body {
    background-color: #152;
    text-align: center;
  }
  svg {
    width: 100px;
    height: 100px;
    background-color: #cfc;
    border-radius: 28px;
    margin: 15px 20px 0px 20px;
  }
  </style>
  <script>
  ordre=function (val) {
    var xhr=new XMLHttpRequest();
    xhr.open("GET", val, true);
    xhr.send(null);
  };
  </script>
</head>
<body>
  <iframe src="http://raspberrypi.local:8000" width="640" height="480"></iframe>
  <br>
  <svg onclick="ordre('G1');"><path d="M 25 75 L 50 20 L 75 75"/></svg>
  <svg onclick="ordre('D1');"><path d="M 25 75 L 50 20 L 75 75"/></svg>
  <br>
  <svg onclick="ordre('G0');"><path d="M 29 29 H 71 V 71 H 29"/></svg>
  <svg onclick="ordre('D0');"><path d="M 29 29 H 71 V 71 H 29"/></svg>
</body>
</html>